Getting started with Blixt Mobile Node
How to start using a LN node on your mobile, easy step by step
🇪🇸 Español | 🇮🇹 Italiano | 🇫🇷 Français | 🇭🇷 Hrvatski
Please check updated version on my Github page
This guide is dedicated to all those new users that want to start using Bitcoin Lightning Network (LN) in a FREE OPEN SOURCE, FULL NON-CUSTODIAL way:
Using Blixt Wallet, a full LN node on your mobile, wherever you are.
If you never used Bitcoin Lightning Network, before you begin, please read this simple explanation analogy about Lightning Network (LN).
IMPORTANT ASPECTS:
1 - Blixt is a private node, NOT a routing node! Keep that in mind.
That means, all the LN channels in Blixt will be unannounced to the LN graph (so called private channels). That means, THIS NODE WILL NOT DO ROUTING of others payments through Blixt node.
This Blixt node is NOT for routing, I repeat. Is mainly to be able to manage your own LN channels and do your LN payments privately, whenever you need.
This Blixt node, is necessary to be online and synced ONLY BEFORE you are going to do your transactions. That’s why you will see an icon on top that indicate the sync status. It takes only few moments, depending how much time you kept it offline.
2 - Blixt is using LND (aezeed) as wallet backend, so don’t try to import other types of bitcoin wallets into it. Here you have explained the types of wallets. So if you had previously a LND node, you can import the seed and the backup.channels into Blixt, as it is explained in this guide.
3 - Blixt important links (please bookmark them):
Blixt Github page | Github Releases (download the apk file directly)
Blixt Features page - explaining one by one each feature and functionality.
Blixt FAQ page - List of Q&A and troubleshooting of Blixt
Blixt Guides page - demos, video tutorials, extra guides and use cases for Blixt
Printable A4 flyer with first steps using Blixt, in various languages.
Blixt also offers a full functional demo right on its website or on a dedicated version web, to have a full experience testing, before start using in real world.
Telegram group for more support
This article is a step-by-step guide, how to start using this amazing app, Blixt Wallet.
Blixt - First Contact
So… Darth’s Mom decided to start using LN with Blixt. Hard decision, but wise. Blixt is only for smart people and those who really want to learn more, deep use of LN.
Darth warn his mom:
“Mom, if you start using Blixt LN Node, you will need first to know what is Lightning Network and how it works, at least at basic level. Here I put together a simple list of resources about Lightning Network. Please read them first.”
Darth’s Mom read the resources and did her first step: install Blixt on her brand new Android device. Blixt is also available for iOS and macOS (desktop). But those are not for Darth’s Mom… Nevertheless it is recommended to use a newer version of Android, at least 9 or 10 for better compatibility and experience. Running a full LN node on a mobile device is not an easy task and could take some space (min 600MB) and memory.
Once you open Blixt, the “Welcome” screen will give you some options:
On top right corner, you will see 3 dots that activate a menu with:
“enable Tor” - user can start with Tor network, in special if wanted to restore an old LND node that was running with Tor only peers.
“Set Bitcoin node” - if user want to connect to its own node directly, to sync the blocks through Neutrino, can do it straight away from welcome screen. This option is also good in case that your internet connection or Tor, is not so stable to connect to default bitcoin node (node.blixtwallet.com).
Soon it will be added the language there, so user can start straight with a language that is comfortable. If you want to contribute to this open source project with translations in other languages, please join here.
OPTION A - Create new wallet
If you choose to “create a new wallet”, you will be redirected straight to the main screen of Blixt Wallet.
This is your “cockpit” and also is the “Main LN Wallet”, so be aware, it will show you only the balance of your LN wallet. The onchain wallet is separately displayed (see C).
A - Blixt blocks sync indicator icon. This is the most important thing for a LN node: to be synchronized with the network. If that icon is still there working, means your node IS NOT READY! So have patience, in special for the first initial sync. It could take up to 6-8 min, depending on your device and internet connection.
You could click it and see the status of the sync:
Also you could click on the “Show LND Log” (A) button if you want to see and read more technical details of the LND log, in real time. Is very useful for debug and learning more how LN works.
B - Here you can access all the Blixt Settings, and are a lot! Blixt is offering many rich features and options to manage your LN node like a pro. All those options are explained in details in the “Blixt Features Page - Options Menu”.
C - Here you have the “Magic Drawer” menu, also explained in details here. Here is the “Onchain Wallet” (B), Lightning Channels (C), Contacts, Channels status icon (A), Keysend (D).
D - Is the help menu, with links to FAQ / Guides page, contact developer, Github page and Telegram support group.
E - Indicate your first BTC address, where you can deposit your first testing sats. THIS IS OPTIONAL! If you deposit straight into that address, is opening a LN channel towards Blixt Node. That means you will see your deposited sats, going into another onchain transaction (tx), for opening that LN channel. You can check that into Blixt onchain wallet (see point C), clicking on the top right TX menu.
As you can see in the Onchain Transaction Log, the steps are very detailed indicating where the sats are going (deposit, open, close channel)
RECOMMENDATION:
After testing several situations, we came to the conclusion that is much better efficient to open channels between 1 and 5 M sats. Smaller channels tend to be depleted quickly and paying a higher % of fees comparative with bigger channels.
F - Indicate your main Lightning wallet balance. This is NOT your total Blixt wallet balance, it represent only the sats you have in Lightning Channels, available to send. As was indicated before, the Onchain wallet is separate. Keep in mind this aspect. The onchain wallet is separate for an important reason: it is used mainly for opening/closing LN channels.
Ok so now Darth’s Mom deposited some sats into that onchain address displayed on the main screen. It is recommended that when you do that, to keep your Blixt app online and active for a while, until the BTC tx is taken by the miners into the first block.
After that could take up to 20-30 min until is fully confirmed and the channel is open and you will see it in the Magic Drawer - Lightning Channels as active. Also the small colored dot on top of the drawer, if is green will indicate that your LN channel is online and ready to be used to send sats over LN.
The address and the welcome message displayed will disappear. There’s no more necessary to open a automatic channel now. You can also deactivate the option in Settings menu.
Is time to move on, testing other features and options to open LN channels.
Now, let’s open another channel with another node peer. Blixt community put togheter a list of good nodes to start using with Blixt.
Procedure to open a LN channel in Blixt
This is very simple, only take some few steps and a bit of patience:
Got to the Blixt Community list of peers
Select a node and click on its name title link, it will open its Amboss page
Click to display the QR code for the node URI address
Open Blixt and go to top drawer - Lightning Channels and click on the “+” button
Now, click on (A) camera to scan the QR code from Amboss page and the node details will be filled out. Add the amount of the sats for the channel you want and then select the fee rate for the tx. You can leave it auto (B) for a faster confirmation or adjust it manually sliding the button. You can also long press the number and edit it as you like.
Do not put less than 1 sat/vbyte ! Usually is better to consult the mempool fees before opening a channel and select a convenient fee.
Done, now just click on the button “open channel” and wait for 3 confirmations, that usually takes 30 min (1 block aprox each 10min).
Once is confirmed, you will see the channel active in your section “Lightning Channels”.
Blixt - Second Contact
Ok so now we have a LN channel with only OUTBOUND liquidity. That means we can only SEND, we still can’t RECEIVE sats over LN.
Why? Did you read the guides indicated in the beginning? No? Go back and read them. It is very important to understand how LN channels works.
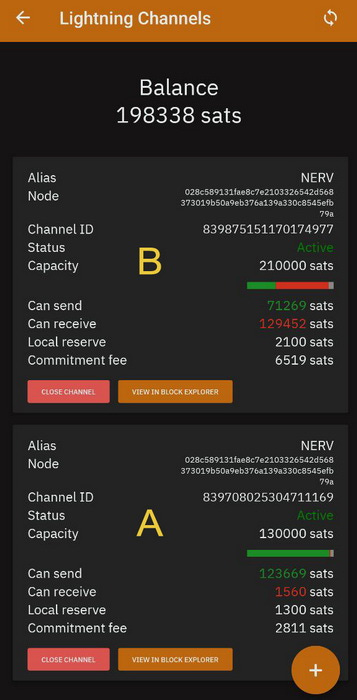
As you can see in this example, the channel open with the first deposit, do not have too much INBOUND liquidity (“Can receive”) but have a lot of OUTBOUND liquidity (“Can send”).
So what options you have, if you want to receive more sats over LN?
Spend some sats from existing channel. Yes, LN is a payment network of Bitcoin, used mainly to spend your sats faster, cheaper, private and easy. LN is NOT a hodling way, for that you have the onchain wallet.
Swap some sats, back into your onchain wallet, using a submarine swap service. In this way you are not spending your sats, but giving it back to your own onchain wallet. Here you can see in details some methods, in the Blixt Guides Page.
Open an INBOUND channel from any LSP provider. Here is a video demo about how to use LNBig LSP for opening an inbound channel. That means, you will pay a small fee for an EMPTY channel (on your side) and you will be able to receive more sats into that channel. If you are a merchant that receive more than spend, that is a good option. Also if you are buying sats over LN, using Robosats or any other LN exchange.
Open a Dunder channel, with Blixt node or any other Dunder LSP provider. A Dunder channel is a simple way to get some INBOUND liquidity, but in the same time you deposit some sats into that channel. Is also good because it will open the channel with an UTXO that is not from your Blixt wallet. That add some privacy.
Is also good because, if you do not have sats into an onchain wallet, to open a normal LN channel, but you have them into another LN wallet, you can just pay from that another wallet through LN the opening and the deposit (on your side) of that Dunder channel. More details how Dunder works and how to run your own server here.
Here are the steps to activate opening a Dunder channel:
Go to Settings, in “Experiments” section activate the box for “Enable Dunder LSP”.
Once you did that, go back up to “Lightning Network” section and you will see that appeared the option “Set Dunder LSP Server”. There, by default is set “https://dunder.blixtwallet.com” but you can change it with any other Dunder LSP provider address. Here is a Blixt community list with nodes that can provide Dudner LSP channels for your Blixt.
Now you can go to main screen and click on “Receive” button. Then follow this procedure explained in this guide.
OK, so after the Dunder channel is confirmed (will take few minutes) you will end up with having 2 LN channels: one opened initially with autopilot (channel A) and one with more inbound liquidity, opened with Dunder (channel B).
Good, now you are good to go, to send and receive enough sats over LN !
HAPPY BITCOIN LIGHTNING!
Blixt - Third Contact
Remember, in the chapter one “First Contact” were 2 options in the Welcome screen:
Option B - Restore wallet
So now let’s discuss about how to restore a Blixt wallet or any other LND crashed node. This is a bit more technical, but please pay attention. Is not that hard.
OPTION B - Restore wallet
In the past I wrote a dedicated guide about how to restore a crashed Umbrel node, where I mentioned also the method of using Blixt as quick restore process, using the seed + channel.backup file from Umbrel.
I also wrote a guide how to restore your Blixt node or migrate your Blixt to another device, here.
But let’s explain in simple steps this process. As you can see in the image above, there are 2 things you should do to restore your previous Blixt/LND node:
top box is where you have to fill with all 24 words from your seed (old / dead node)
bottom are two button options to insert / upload the channel.backup file, previously saved from your old Blixt/LND node. It can be from a local file (you upload it into your device previously) or can be from a Google drive / iCloud remote location. Blixt have this option to save your channels backup directly into a Google / iCloud drive. See more details in Blixt Features Page.
Nevertheless to mention, if you previously didn’t have any open LN channels, there’s no need to upload any channels.backup file. Simply insert the 24 words seed and hit restore button.
Don’t forget to activate Tor, from the top 3 dots menu, as we explained in the Option A section. That is the case when you ONLY had Tor peers and could not be contacted over clearnet (domain/IP). Otherwise is not necessary.
Another useful feature is to set a specific Bitcoin node from that top menu. By default it sync blocks from node.blixtwallet.com (neutrino mode) but you can set any other Bitcoin node that provide neutrino sync.
So once you fill those options, and hit the restore button, Blixt will start first to sync the blocks through Neutrino as we explained in the First Contact chapter. So be patient and watch the restore process in the main screen, by clicking on the sync icon.
As you can see in this example, it shows that the bitcoin blocks are 100% synced (A) and the recovering process is in course (B). That means the LN channels you had previously, it will be closed and the funds restored into your Blixt onchain wallet.
This process takes time! So please, be patient and try to keep your Blixt active and online. The initial sync could take up to 6-8 min and the closing channels could take up to 10-15 min. So you better have the device charged well.
Once this process it started, you could check in the Magic Drawer - Lightning Channels, the status of each of your previous channels,showing that are in “pending to close” status. Once each channel is closed, you could see the closing tx in the onchain wallet (see Magic Drawer - Onchain), and open up the tx menu log.
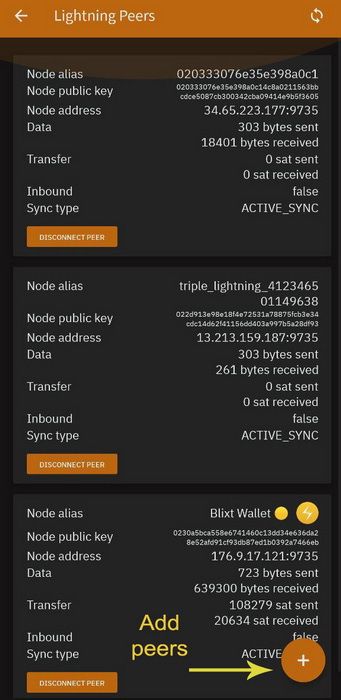
Also will be good to check and add if are not there, your previously peers you had in your old LN node. So go to Settings menu, down to “Lightning Network” and enter into option “Show Lightning Peers”.
Inside the section you will see the peers you are connected in that moment and you could add more, better to add those you had channels before. Just go to Amboss page, search for your peer nodes aliases or nodeID and scan their node URI.
As you can in the image above, are 3 aspects:
A - represents the clearnet node address URI (domain/IP)
B - represents the Tor onion node address URI (.onion)
C - is the QR code to scan with your Blixt camera or the copy button.
This node address URI you have to add it into your peers list. So be aware is not enough just the node alias name or nodeID.
Now you can go to Magic Drawer (top left menu) - Lightning Channels, and you can see at which maturity block height the funds will be returned into your onchain address.
That block number 764272 is when the funds will be usable in your bitcoin onchain address. And it could take up to 144 blocks from the 1st confirmation block until are released. So check that in the mempool.
And that’s it. Just wait patiently until all channels are closed and funds back into your onchain wallet.
Blixt - Fourth Contact
This chapter is about customization and know better you Blixt Node. I will not describe all the features available, are too many and were already explained in the Blixt Features Page.
But I will point out some of those necessary to go forward using your Blixt and have a great experience.
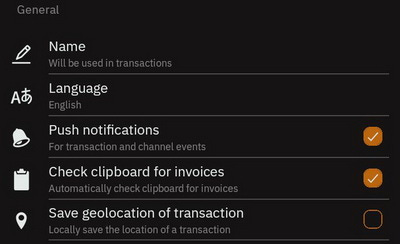
A - Name (NameDesc)
The NamDesc is a standard for conveying "receiver name" in BOLT11 invoices.
This could be any name and can be changed anytime.
This option is really useful in various cases, when you want to send a name together with the invoice description, so the receiver could have a hint from who received those sats. This is fully optional and also in the payment screen, user have to tick the box indicating to send the alias name.
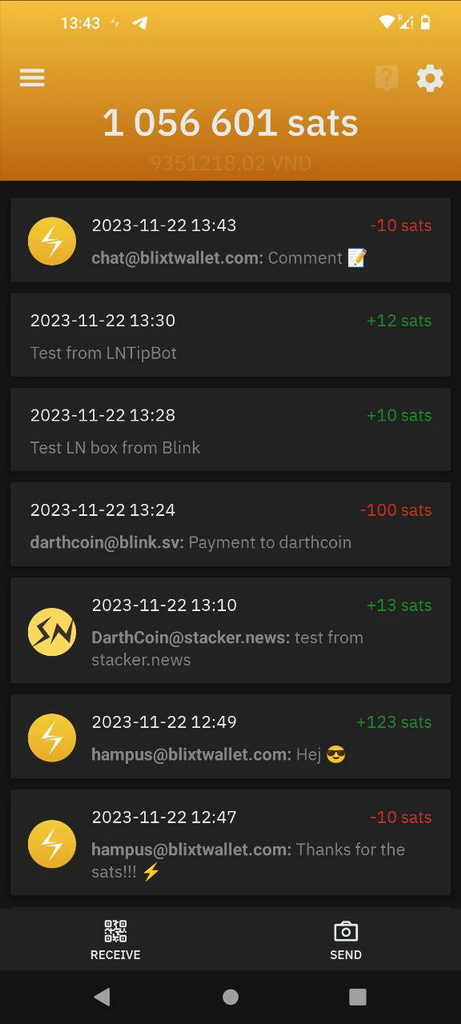
Here is an example of how would appear when you use chat.blixtwallet.com
This is another example sending to another wallet app that support NameDesc:
B - Lightning Box
Starting with the new v0.6.9-420 recently announced, Blixt introduced a new powerful feature for Lightning Address in Blixt.
This new feature is optional opt-in, is not ON by default!
For the moment the default LN Box is run by Blixt server and offer a @blixtwallet.com LN Address. But ANYBODY with a LND public node can run the Lightning Box server and offer LN Address for its own domain, self-custody.
Right now, the Blixt server is only forwarding the payments sent to LN addresses @blixtwallet.com to the Blixt users that set their LN address. Users must put their Blixt node wallet in "persistent mode" in order to receive these payments to their @blixtwallet.com LN addresses.
See in the release notes the video demo about how to setup your LN Address in Blixt.
This LN address implemented into Blixt wallet app, is like a chat over LN, instant and fun, also supporting LUD-18 (adding an alias name to a payment). You can add in contact list all your regular LN addresses you are using frecquently and have it at hand for chatting. Now Blixt can be considered a full LN chat app 😂😂.
Another useful feature is the full support fro LUD-18 (that also Stacker.News and others is supporting it).
As you can see in the screenshot above, sending from a Stacker News account, it displayed nicely the logo + LN address + message. Same way works for sending from Blixt, you can attach your Blixt LN Address or simply add the alias name (previously set in Blixt settings) or even both.
This option from LUD-18 could be useful also for subscription services, where user can send a specific alias (is NOT your node alias or your real name!) and based on that you could be registered or receive back a specific message or whatever else. Attaching an alias name (LUD-18)+ comment (LUD-12) to a LN payment can have multiple use cases!
Here is the code for Lightning Box if you run it for yourself, for your family and friends, on your own node.
Here also you can run the LSP Dunder server for Blixt mobile nodes and offer liquidity for Blixt users if you have a good public LN node (works only with LND).
C - Backup LN Channels and seed words
This is a very important feature !
After opening or closing a LN channel you should do a backup. It can be done manually saving a small file on local device (download folder usually) or using a Google Drive or iCloud account.
Go to Blixt Settings - Wallet section. There you have the options to save all important data for your Blixt wallet:
“Show mnemonic” - will display the 24 words seed to write them down
“Remove mnemonic from device” - this is optional and use it only if you really want to remove the seed words from your device. This will NOT wipe your wallet, only the seed. But be aware ! There is not way to recover them if you did not write them down first.
“Export channel backup” - this option will save a small file on your local device, usually into “downloads” folder, from where you can take it and move it outside your device, for safe keeping.
“Verify channel backup” - this is good option if you use Google drive or iCloud to check the integrity of the backup done remotely.
“ Google drive channel backup” - will save the backup file into your personal Google drive. The file is encrypted and is stored in a separate repository than your usual google files. So there are no concerns that can be read by anybody. Anyways that file is totally useless without the seed words, so nobody can take your funds from that file only.
I would recommend for this section the following:
use a password manager to store safely your seed and backup file. KeePass or Bitwarden are very good for that and can be used on multiplatform and self hosted or offline.
DO THE BACKUP EVERY TIME you open or close a channel. That file is updated with the channels info. There’s no need to do it after each transaction you’ve done on LN. The channel backup is not storing that info, is storing only the status of the channel.
Conclusion
OK, there are many other amazing features that Blixt offers, I will let you discover them one by one and have fun.
This app is really underestimated, mainly because is not backed by any VCs funding, is community driven, build with love and passion for Bitcoin and Lightning Network.
This mobile LN node, Blixt is a very powerful tool in hands of many users, if they know how to use it well. Just imagine, you are walking around the world with a LN node in your own pocket and nobody will know it.
And not talking about all other rich features that come with, that very few or none other wallet apps could offer.
Meanwhile here are all the links about this amazing Bitcoin Lightning Node:
Main Webpage - Features | Guides | FAQ
Github Page - Community list of good peers for Blixt | Releases
Geyser crowdfunding page - donate sats as you like to support the project
LNURL Chat Blixt - anonymous LN chat
Blixt v 0.6.0 presentation - promo video (you can test your 1st use of LN)
Blixt Girls Calendar - promo video (you can test your 1st use of LN)
DISCLAIMER: I am not paid or supported in any way by the developers of this app. I wrote this guide because I saw that the interest in this wallet app is increasing and new users still don’t understand how to start with it. Also to help Hampus (the main dev) with documentation about using this node wallet.
I do not have any other interest in promoting this LN app, other than pushing forward the Bitcoin and LN adoption. This is the only way!
MAY THE ₿ITCOIN BE WITH YOU!
If you appreciate DarthCoin work, you can send some satoshis to darthcoin@getalby.com or darthcoin@stacker.news or darthcoin.blink.sv
or using Cashu Address darthcoin@minibits.cash
If you do not want to subscribe on substack, all DarthCoin Bitcoin guides are also announced on this dedicated Telegram Channel, for easy search and keep track.
To subscribe on substack, click here:

